Many organizations need to track their Azure costs at various levels of granularity. Popular use cases cover chargebacks to internal departments, tracking of costs by customer, specific application, etc.
Azure’s inherent categorization of its resources allows users to categorize resources by tags or resource groups.
Resource Groups are often used to group resources by an application or deployment strategy. Every resource can belong to only one group. It is important to understand that resource groups are used for deploying, updating and deleting resources, so all resources in the group should have the same lifecycle.
Tags can be used to organize resources into logical groups, based on arbitrary criteria, for example by system, department, or customer. Each resource can have zero or many tags associated with it.
Netreo allows users to track costs grouped by those tags and resource groups. By defining meaningful tags for individual resources, users can easily find out Azure costs of running particular systems, customers, or know how to charge-back to particular departments.

In this article we’ll explain how to track Azure costs per tag and per user group using Netreo. To learn more about monitoring and automating Azure Billing, and for tips on saving costs, read this article.
To track Azure costs per tag:
If you aren’t using Netreo yet, Request a Demo up fand have one of our sales team members run you through it. Learn more about the setup process here.
Netreo obtains information about resources utilization from Azure Management API and calculates costs based on the selected offer and currency. It’s important to specify the right offer and currency when configuring Azure Billing resource to guarantee that Netreo calculations are correct.
A simple way to see what tags you currently use and which resources belong to them is to follow these steps:

To apply a tag to a resource, navigate to the detailed view for this resource. Open the “Tags” tab and provide a new tag key and a value.
Read this article to learn how to create and manage tags programmatically or thru the Azure portal.
By default Netreo tracks cost by tag for all tags in the current month in a metric called “CurrentMonthBreakdownByTag” and for all resource groups in a metric called “CurrentMonthBreakdownByResource”. The results are presented as tables containing tag/resource group names and costs associated with them.
It’s also possible to define a metric that will track costs of a specific tag or a resource group so that the cost can be plotted on charts and trends can be analyzed over time.
To define a metric that tracks costs for a specific tag:

The data collected by Netreo is presented in a chart, showing costs over time:
 5. Alert when costs exceed specific threshold
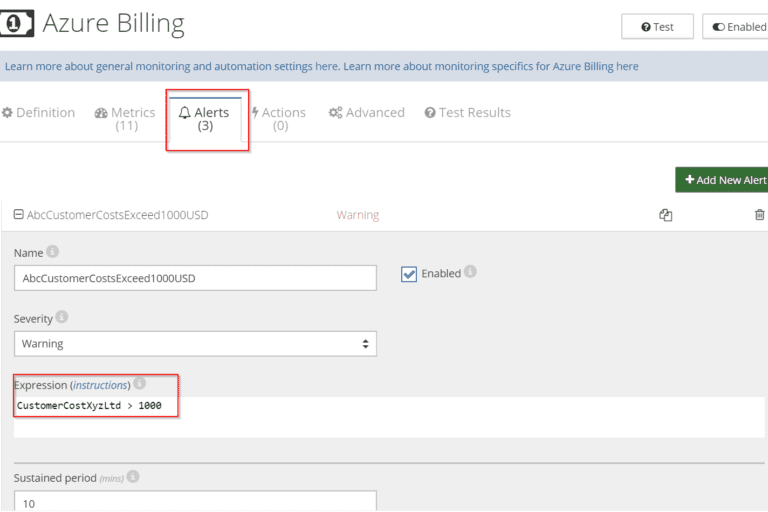
The cost per tag or resource group is just an ordinary Netreo metric. It can be used in alerts, actions, and auto-scaling rules.
For example, you can get notified every time the monthly cost of resources for customer ABC Ltd exceeds 1000 USD:

Information about costs can be used in alerts and automation rules, just like any other metrics. For example, it’s possible to receive notifications when costs increase over 20% as compared to the previous month, or to stop an expensive resource in a test environment when the total cost exceeds allowed threshold.
Read this article to learn how to control your Azure costs automatically.